Chariot
0
A checkered quilt spread out under the trees on Mount Royal, sunlight catching the rim of a jade-green glass tumbler, a stack of mismatched teacups waiting for lemonade. That's a vintage picnic. Not the kind with stiff paper plates and a cooler bag — the kind with character, the kind people stop to ask about.
Let's build your vintage picnic kit, one piece at a time. Here's exactly how to do it — step by step, no guesswork required.
Step 1: Start With the Foundation — Your Basket and Blanket
Every great vintage picnic starts with two things: something to carry it all in, and something to lay it all out on.
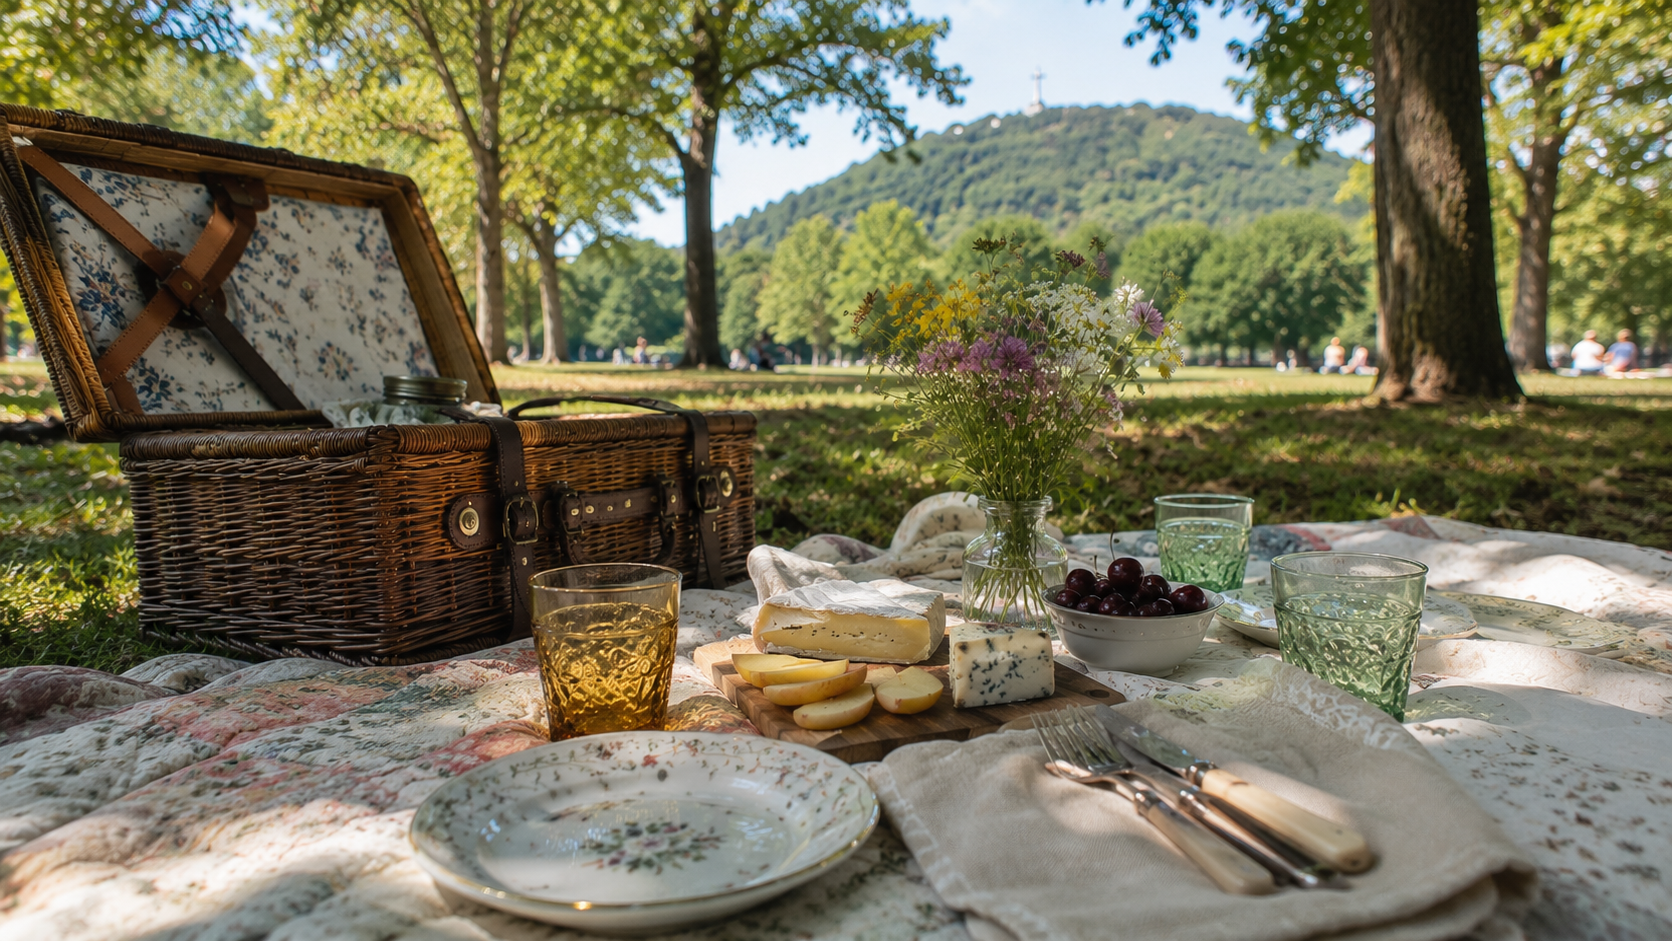
A wicker or rattan basket is the obvious treasure to hunt for, and they turn up often — sturdy ones with working clasps, some with the original fabric lining still intact. When you're checking one out, give the handles a firm tug and look at the weave for any soft or crumbling spots. A little wear adds character; structural damage doesn't.
For the base layer, skip the modern picnic blanket. A vintage quilt or a well-loved tablecloth does the job better and looks infinitely better doing it — florals, ginghams, and faded stripes all work beautifully against green grass. Give fabric a sniff and a once-over for stains before you commit, but don't be afraid of a little softness from age. That's the point.
Curious what's currently sitting in our home goods section? New baskets, quilts, and linens land every week, so the hunt is always a little different.
Step 2: Embrace Mismatched (On Purpose) Dinnerware
Here's a secret: mismatched vintage plates don't look careless. They look intentional — like you collected each piece over years instead of pulling them off one shelf at a big box store.
Mix patterns with confidence. A floral plate next to a plain cream one next to something with a gold rim all sit together just fine on a picnic blanket, especially with food on top tying it together. The trick is consistency in size, not pattern — keep dinner plates roughly the same diameter so the spread feels styled rather than scattered.
One practical note: vintage china can be more delicate than what you're used to. Pack pieces snugly, wrap them in your napkins or a spare tea towel for the trip, and save the truly fragile pieces for picnics close to home.
Step 3: Glassware That Catches the Light
Nothing photographs better than a vintage glass tumbler with sunlight passing through it. Coloured glass — amber, sea green, smoky grey — turns even sparkling water into something worth a second look.
If true vintage glassware feels like a splurge for an outdoor outing, mason jars are a perfectly good stand-in and they're nearly indestructible on the move. But if you do find a set of coloured tumblers or a few mismatched cordial glasses, snap them up. They're some of the most affordable vintage picnic ideas out there, often just a couple of dollars each, and they instantly elevate a simple drink into something that feels like an occasion.
Step 4: A Vintage Serving Board or Tray
Every picnic needs a centerpiece, and a found wooden board or tray is an easy one. Use it for cheese and crackers, sliced fruit, or a simple charcuterie spread — the wood grain alone does most of the styling work for you.
Vintage wood pieces sometimes need a little love before their first use. A light sand if the surface feels rough, followed by a food-safe mineral oil, will bring back the finish and make it safe for direct food contact. It's a small extra step, but it's the kind of practical care that turns a $6 find into something you'll reach for all season.
Step 5: Layer in Textiles and Cushions
Comfort matters as much as looks. A couple of vintage cushions or a soft throw blanket make the difference between a quick sit-down and an afternoon you don't want to leave. Look for fabric that can handle a little grass and sun — nothing too precious.
Swap paper napkins for vintage linen ones. They fold beautifully, wipe up spills just as well, and pack flat. One packing tip: roll your textiles around your glassware instead of layering them loosely. It cushions the fragile pieces and saves you a step when you're loading the basket.
Step 6: Finishing Touches — the Small Vintage Details
This is where a picnic goes from "nice" to "I need to know where you found that." A small bud vase with a couple of cut flowers tucked beside the cheese board. A set of vintage cutlery with bone or wooden handles. An old transistor radio for low background music, or a worn paperback left open on the blanket as a prop.
None of these need to be expensive, and none of them need to match anything else you've packed. They're the details people remember.
Step 7: Where to Picnic in Montreal
Once your kit is built, it deserves a proper outing. A few favourites:
-
Mount Royal Park — the classic choice, with sweeping city views from the lookout and plenty of open lawn for spreading out
-
Jeanne-Mance Park — right in Mile End, easy to reach, and perfectly sized for an afternoon hangout
-
Lafontaine Park — in the Plateau, with shaded paths and a lake view if you want something a little quieter
If you're picnic shopping in the Plateau, our Plateau location is a short walk from Lafontaine Park, so you can build your kit and head straight there.
Bring It All Together
A vintage picnic isn't about spending more — it's about choosing pieces with more character, one basket, one quilt, one mismatched teacup at a time. Every item you find this way is sustainable, affordable, and genuinely one-of-a-kind, which is exactly the kind of picnic worth showing up for.
Ready to start building your kit? Stop by EcoDepot Montreal in Lachine or the Plateau this week — our shelves change constantly, and you never know which basket, blanket, or set of glassware is waiting for its next picnic.